Pages

Showing posts with label Kate Spade planner. Show all posts

Friday, October 17, 2014

Craft Studio and Desk Makeover

Hi everyone!

I recently redid my craft studio to gain some additional table room because I couldn't spread out enough. I also didn't want to spend a lot of money and wanted to use what I had.

I apologize In advance for the less than stellar lighting. I don't get great natural light in these areas. Ironically enough!

Here's a Before shot. 


And here's an After.

Simple furniture helped me gain the entire wall where a linen armoire was. 


Plenty of room now. I can even transport my stationery supplies here if I want to journal on the table. I used to do that on my bed. 


Most of the wall storage is the same. I just added more washi tape storage. I prefer them stored this way because they hardly take up any room. 


Super simple shelving was put up and it allowed me to clear a lot of things on the counter but they were all still easily accessible. 


I took out the boxes of planners from their hiding place.


This nook holds office supplies and files in the rolling cabinet. The frame was one that belonged to my grandparents, repurposed and strung with wire and clips. 

The drawer system holds handmade cards and other bits and pieces, and the document holder on the left was from my mom. It holds card stock, envelopes, etc. 


Dollars spent: about $20

A few weeks later, I was inspired to makeover my vanity as well. It needed some sprucing up. The bigger motivation though was that I wanted a pretty desk but as you can see from my craft studio, there's no room for a desk. 

Here's a Before shot. Functional, but not really very pretty, and looking a little but cluttered. 


Here's the After. A little bit more streamlined, and functions better as a desk. It also doesn't take away from its function as a vanity. The makeup on the counters is just stored elsewhere but still within reach. 


FYI, $0 spent because I already had everything I used.

A close up of the left side. easily transportable planner supplies in the dotted case, and self inking stamps in the floral cases. 


Pens, etc., separated by function in these cups. I've had these forever and use them everywhere. 


I love it for writing, planning, journaling, without the makeup getting in the way and distracting me. The brushes had to stay where they were though. 


This is what the drawers look like now. 


And this 3-drawer system that used to be nail products storage now holds makeup instead.


And that's it, my two makeovers. The desk was weeks in the making because I had to work out in my head first what I wanted to do. Once I figured it out though, it just took about an hour

Now I need to find storage for my nail polish. 

Thanks for visiting!


Friday, September 12, 2014

Updated Planner Set Up

Hi everyone!


I want to start by saying there is no perfect planner set up. I myself change things around A LOT. Whatever works for you is the perfect set up for you. I'm showing how mine is at the moment but things change around so much - I add, remove, and switch things around at will.  However, the main components will always remain the same.

I also find setup posts daunting because there's just so much to write about and photos sometimes don't do them justice. But I'll give it a shot anyway. (:

First off, here are the contents of the pockets. This planner has so many pockets that I use to carry whatever supplies I need. My planner is quite self-sufficient as you'll see later. 


I've been loving switching around my dashboard a lot lately. At the moment, it's this glitter washi'ed flyleaf with a blinged key that was a gift. 

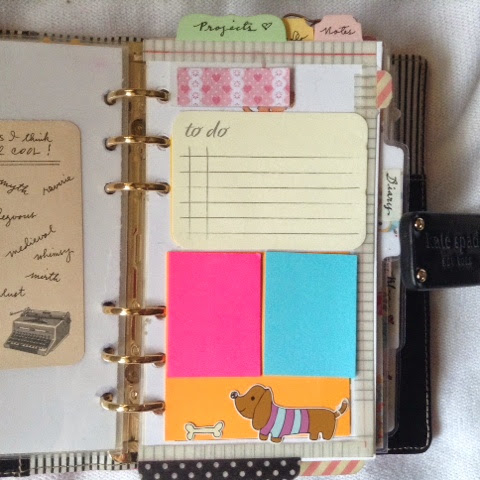
Immediately following that is my sticky note section that I've always had. It just makes it easy to flip to a page and jot down a quick note to give out to someone, or file properly at a later date. This thing moves around a lot in the planner depending on my mood. 


I also have a Filofax brand Multi Purpose Card holder to hold stickers and the occasional cute Project Life card. 


Next is the Diary. This is the heart of my planner. I prefer it to be the first thing in my planner but sometimes have it in the middle too. Right now, it's right after the sticky note station. I have a flyleaf that's cut down to about 1/4 inches wider, and edged with washi tape, to take me to straight to the yearly spread. 


Month View

There are two monthly charts included in the Diyfish pack. I use the gridded monthly chart for bills, vet visits, and other payments I need to make. 


The monthly calendar view is used as a mini journal. I refer to this spread to create a monthly journaling page in my Midori. This is the first time I'm using her inserts. 

Week and Daily View

Currently, I'm using the diyfish V2 Style 3 for the weeklies with day-on-one-page for my diary. I'm loving it so far. I enjoy the extra room I have to write just about anything I want. I also use it as a journal for the day. 


After the Diary are my tabbed sections. I've written about this often enough in earlier posts. Just search 'setup' to find them. 


Finally, my Color-Coded section. I love this section because I can find things easily when I need something. It's similar to the A to Z 'filing cabinet' concept but with colored tabs instead. My categories are Me, Home, Family (including the dog), Financial, Crafts and Media. 


The very back has a plastic envelope for loose pieces of paper and a laminated page lifter. 


I love this Kate Spade binder because the pockets are so functional. I slipped a flyleaf with a pen loop that can hold a fat pen because I think the pen loop it comes with is too tight. 

And there it is, my current setup. It's not much different from what I used to have but I've been enjoying prettying it up. 

If you have any questions, please let me know in the comments. Thanks for visiting!


Thursday, August 28, 2014

Stationery Storage


Hi everyone!

My storage system has changed significantly vs. previous years and I thought it warranted a new post. 

I've been hesitant to write this post because some of the items I use might not be available where you live. I myself find it frustrating when I want something I can't find locally. I decided to write it anyway to maybe just give you some ideas on how you can improvise with your storage. 

I have corralled all the items I use for my planner and Midori so that I didn't need to run to my craft studio when I needed something, or when inspiration strikes in the middle of the night. I keep these in my room (I know!) either at the foot of my bed when I'm working on something, or under the bed at night. I can also carry them around the house if needed. 

First off, this is where I keep planner inserts and stickers. I've had these for quite a while now and they work perfectly for me!  The hot pink zippered Beabi case was used as pen storage until I downsized my pens and used them for stickers instead. Personal size inserts fit perfectly in the Martha Stewart accordion files. 


My most used items are kept in this Beabi case that I think is actually makeup or cosmetic storage. It's perfect for my daily and most-used items and will be at my bedside at night. It's a look-alike for the Kate Spade Tuxedo Court case at a fraction of the price!


I will switch out the items here so that I know I'm using what I have. This is what it contains at the moment. It holds a ton, and there's plenty of room for more. 


My main storage is this craft tote that I also found locally for about $8!  It's structured enough to hold it's shape but soft enough to fold if not needed. It has a Velcro attachment inside for compartmentalizing your stuff if needed, but as you'll see, I didn't use it. 


Instead, I got some B5 sized plastic containers from a Japanese store. They're a perfect fit! Each container has items by category: sticky notes, note pads, bookmarks and clips, etc.


It has pockets on all sides and this is what's in them. 


Here's another way of storing those B5 containers. 


I feel very efficient, organized, and contained in this storage system. I know where everything is and I can find them quickly. 

And this is where I keep my planners and Midori supplies. I keep my planners in boxes because it's dusty in the city and this preserves them well, as well as their leather smell, when not in use. 


That's it, my current stationery storage system. I hope that helped you somehow in finding the system that works for you. 

If you have any questions, please don't hesitate to ask me in the comments. 

Thanks for visiting!


Thursday, July 24, 2014

Top Ten Fun Things You Can Do With Your Planner

Hi everyone!

We all start out wanting to use a planner to get our lives organized. I've realized though that it also helps that your planner is running smoothly, you can find things easily, and that it's also pretty to look at. That last thing is obviously not the most important aspect of paper planning, but it sure is the most fun!

Over the years, I have had several permutations of how I've used my planner/s. The two constants have been that I can still manage my days with it and that I want to continue to use it. 

Here are the top ten things you can do to enjoy using your planner. Enabler Alert!

And if you see me on Instagram, some of these may be familiar to you. 


DIY'ing It

1. Personalizing your dashboard/flyleaf to reflect your personality and/or add color.


This is the one thing I do to switch it up a bit and keep my planner from being just a boring calendar. I change it quite frequently depending on my mood, and I enjoy making them myself. There are many printables you can download, or paper you can buy, to create your own. I have quite a stash of these but I still continue to make more. 


2.  Coordinating your tabs and/or dividers that divide your sections. 


I've had some success lately (I know, late to the game) making laminated dividers, and I've been making a set for each of my planners. I've also made some cute, quirky ones that I never thought I would ever like. Monsters! In my planner! Yeah!


There's lots of pretty paper to choose from, or simply print ones you like. I print quotes too and love having them as dividers. 


You could also use repositionable tabs like these from Martha Stewart, my personal favorite. But there are tons of other brands to choose from like Post-It and Avery. 


Using stationery supplies. 

3. Sticky notes are super functional and there are tons of cute ones to choose from. I have a few I love because they're either cute, stick really well, or both. I stick them everywhere for quick notes, and always have a stash in my planner. They add color to your pages if you prefer not to decorate them, which I don't, and which brings me to my next point,


4. Decorating your pages. 

I personally don't do this on my weeklies although I would for a special occasion like Christmas or my birthday. I do decorate my monthlies which I use as a mini journal.


There's a plethora of supplies to choose from - washi tape, stickers, stamps, sticky notes, etc., etc. The only limits are your imagination, and the possibilities are endless. This is also one of the things I've seen that make some want to actually use their planner and if it helps you to be organized and efficient, I say go for it! 


5. Using cute bookmarks. 


I personally use bookmarks everywhere to (1) clip pages together or (2) mark important pages. There are several kinds: shaped paper clips, binder clips, magnetic bookmarks, etc. I'm sure you'll find the one that works for you, or have a selection at hand to choose from. I love them all!


6. Making/printing your own inserts. 

Another thing I don't do because I'm rubbish at printing and cutting so I'll just buy my inserts. But if you need something specific to your needs, or want to personalize your own, you may want to try this. 

Here are weekly inserts I asked someone to make for me. She prints, cuts, and punches them herself so all I need to do is stick them in my planner. 


7. Adding charms. 


Again, something I don't do because I tried it once and it got in my way. But it makes for a very girly planner I think. 


8. Using cute pens. 


I think if you're reading this blog it's safe to say you love stationery and have an army of pens at your beck and call. Finding the right pen is very important to me. And finding one that looks good with my planner is heaven. You may have to check around to find one that works best for you. Multi-pens are my personal favorite. 


9. Color Coding. 

I wrote about color coding in an earlier post. Please just search through this blog. 

Some need to color code, some not at all. I'm in between - I color code for certain important things like money or appointments. And I do it in my monthlies. Other than that I just use a black or blue pen. 


10. Decorating/Designing your pockets


This has to be my favorite part. I find doing this both beautiful and functional at the same time. I love having a lot of supplies at hand and pockets provide easy access. I may actually carry around more than I need but I don't care. Ha!

There it is, the Top Ten of Fun Filofaxing! If you think I missed anything, do leave me a comment. 

And I'd be happy to hear how you use your planner!

Thanks for visiting!